直接用一个 虚拟设备 驱动,确立Linux驱动开发的基本模板。 我选择的虚拟设备是环形缓冲区 ,这个东西很常见,就不解释其原理了。
我用的是C语言。
1. 模板建立 文件名:ring_buf.c
#include <linux/init.h> #include <linux/module.h> #include <linux/kernel.h> #include <linux/fs.h> #include <linux/uaccess.h> #include <linux/slab.h> #include <linux/mutex.h> #include <linux/device.h> #include <linux/cdev.h> // 编写所涉及的函数 static int dev_open ( struct inode * inodep , struct file * filep ); static int dev_release ( struct inode * inodep , struct file * filep ); static ssize_t dev_read ( struct file * filep , char * buffer , size_t len , loff_t * offset ); static ssize_t dev_write ( struct file * filep , const char * buffer , size_t len , loff_t * offset ); // 文件操作符 ,通过这个,就可以像操作文件一样操作设备(把设备抽象成文件就是这么抽象的) static struct file_operations fops = { . open = dev_open , . release = dev_release , . read = dev_read , . write = dev_write , }; // 设备驱动模块初始化函数 static int __init dev_module_init ( void ); // 设备驱动模块退出函数 static void __exit dev_module_exit ( void ); // 指定模块初始化函数,这样内核加载模块时可以自动初始化设备模块 module_init ( dev_module_init ); // 指定模块退出函数,这样内核卸载模块时可以自动退出设备模块 module_exit ( dev_module_exit ); // 设备驱动相关信息,这里写了就可以查询文件信息得到 MODULE_LICENSE ( "GPL" ); MODULE_AUTHOR ( "huangcheng" ); MODULE_DESCRIPTION ( "A simple ring buffer driver" ); MODULE_VERSION ( "0.1" ); 这就是一个最简单最抽象的内核驱动模块模板。
具体实现的函数就需要再行实现了。
// 设备名 #define DEVICE_NAME "ring_buf" // 设备类名(在/dev/文件夹中创建设备文件需要,这是为了归类设备的文件夹) #define CLASS_NAME "VirtDev" // 设备号,向内核注册驱动的时候获得的一个唯一ID,通过设备号可以找到这个设备 static int majorNumber ; // 设备类(用来将设备归类,在对应的/dev/ClassName文件夹下可以看到相应的设备) static struct class * ring_bufferClass = NULL ; // 设备结构体(表示内核中的一个实际的设备,因为一个设备可能还有很多子设备,同一个设备号可能表示多个设备,设备结构体才是一一对应的) static struct device * ring_bufferDevice = NULL ; // 实现设备功能所需的全局变量、数据结构等 static char * buffer ; static int read_pos = 0 ; static int write_pos = 0 ; static struct mutex buffer_mutex ; static int __init dev_module_init ( void ) { // 这个函数的主要作用就是向内核注册设备,,并且初始化设备所需的资源 // 向内核注册字符设备 (Linux分为字符设备和块设备 两种),卸载设备的时候需要设备号 majorNumber = register_chrdev ( 0 , DEVICE_NAME , & fops ); if ( majorNumber < 0 ) { printk ( KERN_ALERT "Failed to register a major number \n " ); return majorNumber ; } printk ( KERN_INFO "Registered correctly with major number %d \n " , majorNumber ); // 注册设备类 ring_bufferClass = class_create ( THIS_MODULE , CLASS_NAME ); if ( IS_ERR ( ring_bufferClass )) { unregister_chrdev ( majorNumber , DEVICE_NAME ); printk ( KERN_ALERT "Failed to register device class \n " ); return PTR_ERR ( ring_bufferClass ); } printk ( KERN_INFO "Device class registered correctly \n " ); // 注册设备驱动 ring_bufferDevice = device_create ( ring_bufferClass , NULL , MKDEV ( majorNumber , 0 ), NULL , DEVICE_NAME ); if ( IS_ERR ( ring_bufferDevice )) { class_destroy ( ring_bufferClass ); unregister_chrdev ( majorNumber , DEVICE_NAME ); printk ( KERN_ALERT "Failed to create the device \n " ); return PTR_ERR ( ring_bufferDevice ); } printk ( KERN_INFO "Device class created correctly \n " ); // 初始化设备所需资源(这里是内存和互斥锁 ) buffer = kmalloc ( BUFFER_SIZE , GFP_KERNEL ); if ( ! buffer ) { unregister_chrdev ( majorNumber , DEVICE_NAME ); printk ( KERN_ALERT "Failed to allocate memory \n " ); return - ENOMEM ; } mutex_init ( & buffer_mutex ); printk ( KERN_INFO "Device initialized \n " ); return 0 ; } static void __exit dev_module_exit ( void ) { // 这个函数的主要作用是销毁资源,并从内核中删除设备注册信息 // 销毁设备类,这样就从/dev/文件夹中删除了 device_destroy ( ring_bufferClass , MKDEV ( majorNumber , 0 )); class_unregister ( ring_bufferClass ); class_destroy ( ring_bufferClass ); // 删除设备注册信息 unregister_chrdev ( majorNumber , DEVICE_NAME ); // 销毁资源(这里是互斥锁和内存) mutex_destroy ( & buffer_mutex ); kfree ( buffer ); printk ( KERN_INFO "Device unregistered \n " ); } 这两个函数也比较模板化,这么做之后/dev/文件夹里面直接就有了设备文件,读写测试也就方便了。
真正需要根据设备手册 编写的是下面这些。
#define BUFFER_SIZE 0x1000 static int dev_open ( struct inode * inodep , struct file * filep ) { // 这里打开操作直接打印结果就行,能执行肯定已经打开了 printk ( KERN_INFO "my_ring_buffer: Device has been opened \n " ); return 0 ; } static int dev_release ( struct inode * inodep , struct file * filep ) { // 这个虚拟设备释放操作也不需要干什么,直接打印结果就是了 printk ( KERN_INFO "my_ring_buffer: Device successfully closed \n " ); return 0 ; } static ssize_t dev_read ( struct file * filep , char * user_buffer , size_t len , loff_t * offset ) { int bytes_read = 0 ; if ( mutex_lock_interruptible ( & buffer_mutex )) { return - ERESTARTSYS ; } while ( len && read_pos != write_pos ) { if ( put_user ( buffer [ read_pos ], user_buffer ++ )) { mutex_unlock ( & buffer_mutex ); return - EFAULT ; } read_pos = ( read_pos + 1 ) % BUFFER_SIZE ; len -- ; bytes_read ++ ; } mutex_unlock ( & buffer_mutex ); return bytes_read ; } static ssize_t dev_write ( struct file * filep , const char * user_buffer , size_t len , loff_t * offset ) { int bytes_written = 0 ; if ( mutex_lock_interruptible ( & buffer_mutex )) { return - ERESTARTSYS ; } while ( len && (( write_pos + 1 ) % BUFFER_SIZE ) != read_pos ) { get_user ( buffer [ write_pos ], user_buffer ++ ); write_pos = ( write_pos + 1 ) % BUFFER_SIZE ; len -- ; bytes_written ++ ; } mutex_unlock ( & buffer_mutex ); return bytes_written ? bytes_written : - EFAULT ; } 驱动开发绝不能用CMake,这东西只能用于用户态程序 开发,对于Linux驱动开发必须用Makefile
# 指定内核版本这是一个简单的makefile,可以用来编译内核模块了。
2. 编译运行 cd进入项目文件夹,直接
这样就能完成加载驱动模块的操作
可以通过
来检验。
但是这种情况下可能不能直接读写,需要先改权限,我懒,直接777打满所有权限。
sudo chmod 777 /dev/ring_buf测试的方式也很简单,直接用Linux命令读写
echo "hello" > /dev/ring_buf还可以检查内核日志,printk就是打印到内核消息里面的
卸载内核模块和清理内核日志(建议同时进行)
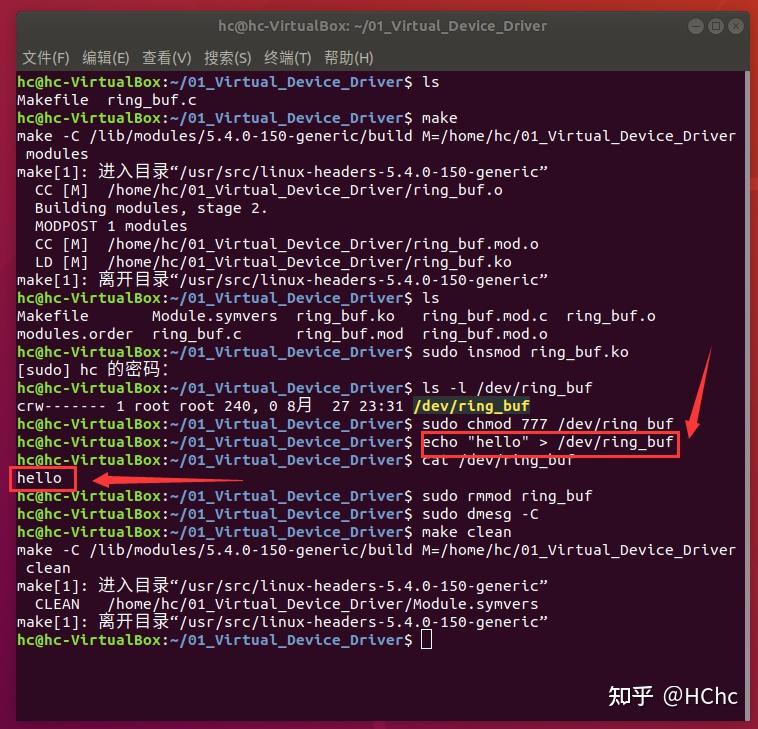
sudo rmmod ring_buf3. 实际运行效果 组合命令
make777 /dev/ring_bufecho "hello" > /dev/ring_buf执行结果:

 |Archiver|手机版|小黑屋|软件开发编程门户
( 陇ICP备2024013992号-1|
|Archiver|手机版|小黑屋|软件开发编程门户
( 陇ICP备2024013992号-1|![]() 甘公网安备62090002000130号 )
甘公网安备62090002000130号 )